Guide
Introduction
What is DiyWeb?
DiyWeb is a visual full-stack development platform built on Laravel 11, designed specifically for independent developers and small to medium-sized teams. Leveraging the Blade templating engine, it offers an intuitive "what-you-see-is-what-you-edit" development experience that addresses the following key requirements:
Core Features:
- 🖌️ Visual Page Building: Quickly construct pages by clicking components or using the page creation button.
- ⚡ Real-time Collaboration: Modifications made in development mode are instantly synchronized with the underlying code.
- 🛒 Out-of-the-Box Functionality: Comes with integrated user systems, payment modules, and other essential business features.
Why Choose DiyWeb?
🎯 Unique Value Proposition
- No-Code Visual Editing: Assemble a personalized website effortlessly by clicking components and utilizing the page creation button – no coding required.
- Intelligent Layout Engine: Automatically responsive design ensures seamless adaptation to any device.
- End-to-End Business Design: Pre-configured with features such as Stripe payment integration, multi-currency support, and order management, saving over 200 hours of integration time.
🏆 User Scenarios
- Individual Users: Create a personal blog or portfolio in just three simple steps.
- Business Users: Build an e-commerce page in as little as five minutes.
📊 Proven Efficiency
- Non-technical users can set up a complete website in an average of 2 hours.
⚙️ Technical Foundation
- Visual Workflow: Features hover-to-edit, real-time preview, and dynamic page creation.
- Template Marketplace: Choose from over 100 professionally designed templates at any time.
Quick Start
System Requirements
- PHP 8.2+
- MySQL
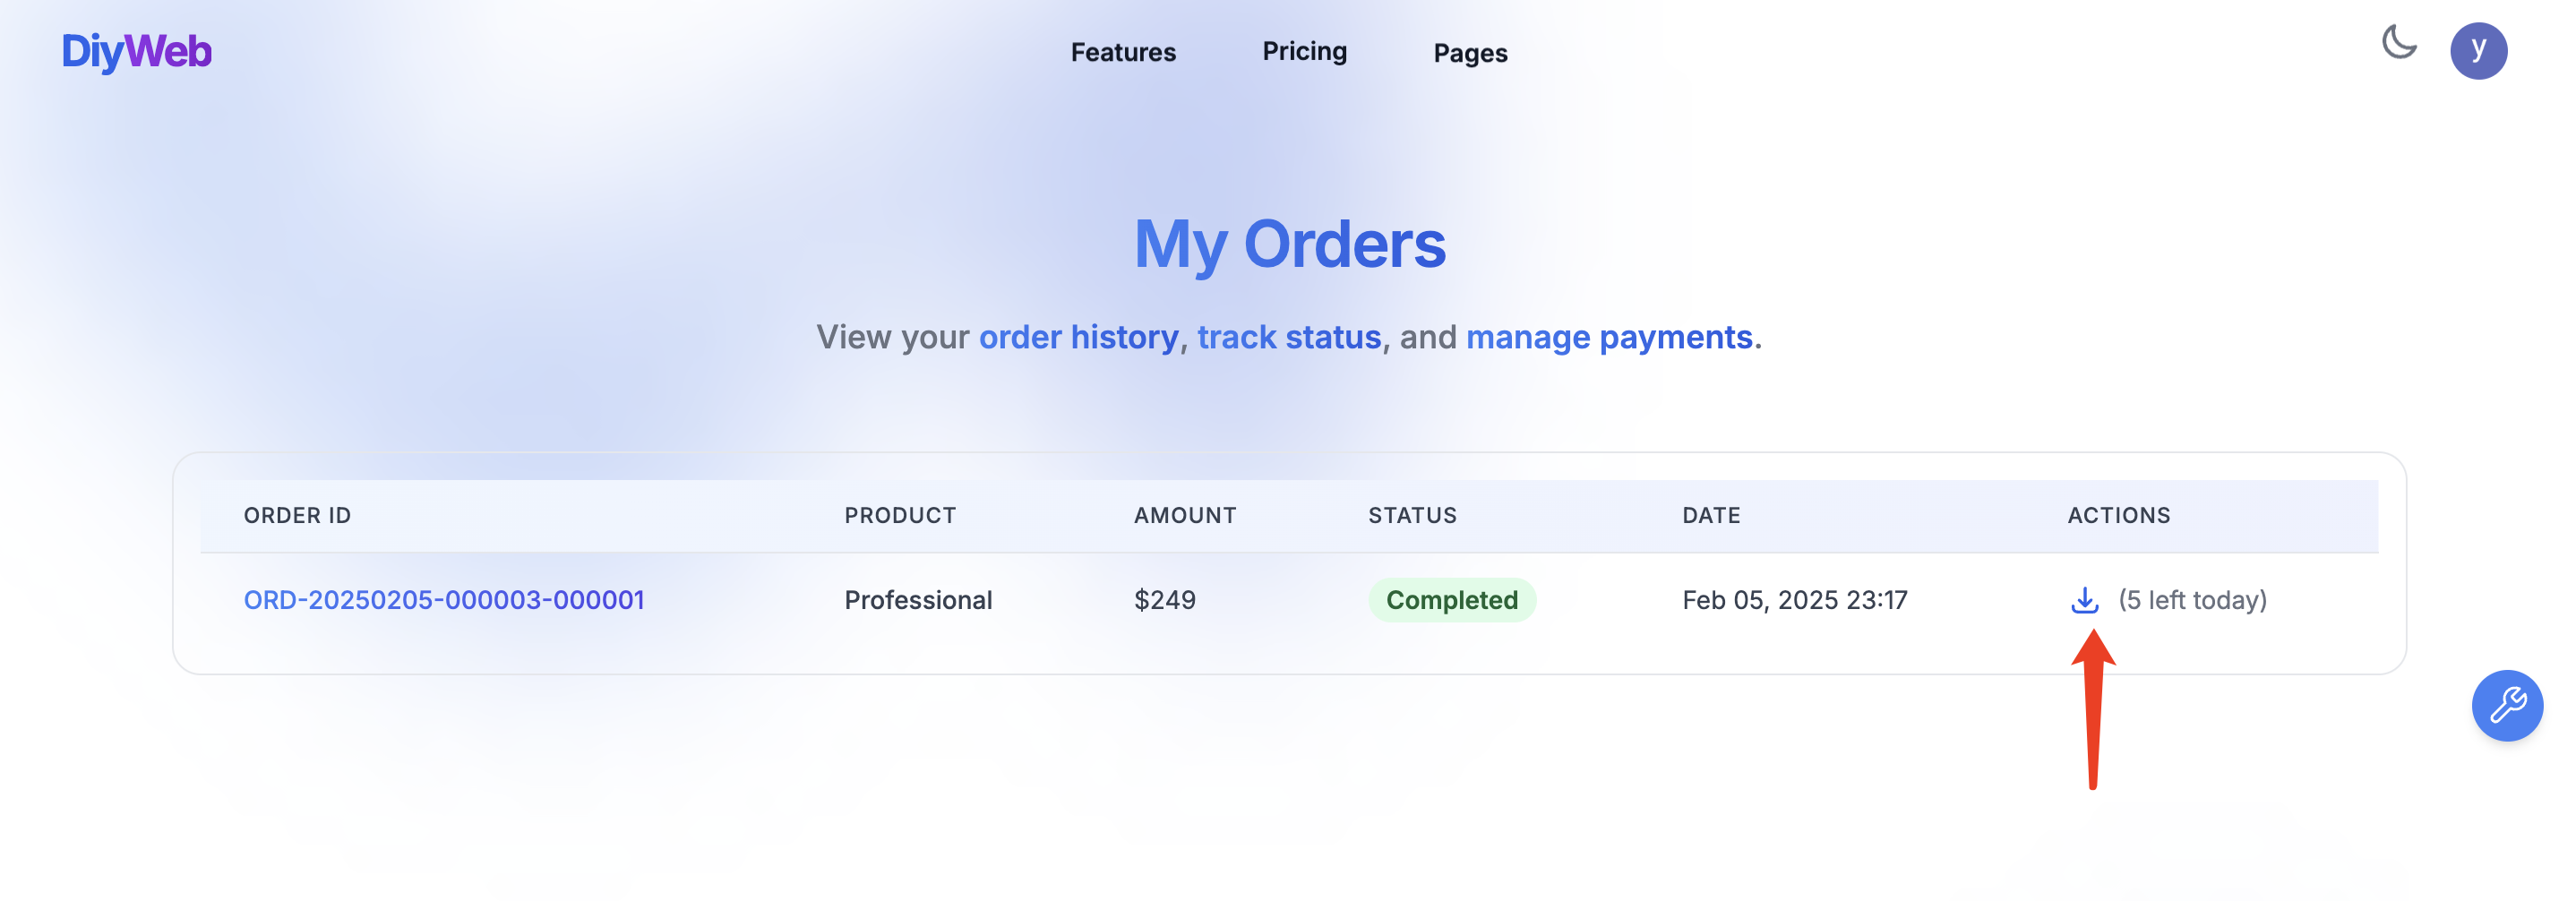
Obtaining the DiyWeb Source Code
Purchase DiyWeb from the official website:
After payment, access your order center:
Click the download button to retrieve the source code:
Installation
To ensure smooth local operation and facilitate further development with DiyWeb, please install the necessary environment on your computer.
Unzip the downloaded code.
Launch the project:
Enter the current project root directory in the terminal and execute the following command to start the project:
php -S 127.0.0.1:8008 -t public
One-Click Installation:
Visit http://127.0.0.1:8008 and follow the on-screen instructions to complete the installation.

Third Party Services Configuration
Before using social login and payment features, you need to create OAuth applications or obtain API keys from the respective platforms. Please refer to the table below for configuration instructions for each service.
| Service | Configuration URL | Parameter Names | Description |
|---|---|---|---|
| GitHub | GitHub Developer Settings | GITHUB_CLIENT_ID, GITHUB_CLIENT_SECRET, GITHUB_REDIRECT_URI | Create an OAuth application in GitHub Developer Settings to obtain the Client ID and Client Secret, and set your callback URL. |
| Google Console - Credentials | GOOGLE_CLIENT_ID, GOOGLE_CLIENT_SECRET, GOOGLE_REDIRECT_URI | Create an OAuth application in Google Cloud Platform to obtain the Client ID and Client Secret, and set your callback URI. | |
| Stripe | Stripe Dashboard | STRIPE_KEY, STRIPE_SECRET, STRIPE_WEBHOOK_SECRET | Obtain your Publishable Key and Secret Key from the Stripe Dashboard, and get the signing secret from the Webhook settings. |
You can add the following configuration examples to your .env file or through the admin Settings:
# GitHub Configuration Example
GITHUB_CLIENT_ID=your_github_client_id_here
GITHUB_CLIENT_SECRET=your_github_client_secret_here
GITHUB_REDIRECT_URI=https://yourdomain.com/login/github/callback

# Google Configuration Example
GOOGLE_CLIENT_ID=your_google_client_id_here
GOOGLE_CLIENT_SECRET=your_google_client_secret_here
GOOGLE_REDIRECT_URI=https://yourdomain.com/login/google/callback

# Stripe Configuration Example
STRIPE_KEY=your_stripe_publishable_key_here
STRIPE_SECRET=your_stripe_secret_key_here
STRIPE_WEBHOOK_SECRET=your_stripe_webhook_secret_here
Replace the placeholders with the actual values you obtain from the respective platforms to complete the configuration.
Admin Email Configuration
There are three ways to set the administrator emails authorized to access the admin panel:
Method 1: Add the ADMIN_EMAILS configuration in the .env file
ADMIN_EMAILS=admin@example.com,admin2@example.com
Method 2: Set the administrator emails via the admin system settings
- Log in to the admin panel using an administrator account.
- Navigate to Settings → Application Settings.
- Locate the
ADMIN_EMAILSconfiguration item. - Enter the new email address(es) (for multiple emails, separate them with commas).
- Click "Save Changes" to apply the changes.
Method 3: Specify the administrator emails during the one-click installation process
On the http://yourdomain.com/install/application page, find the ADMIN_EMAILS configuration item and enter the new email address(es) (for multiple emails, separate them with commas).
Usage
Hover-to-Edit
Toolbar Buttons
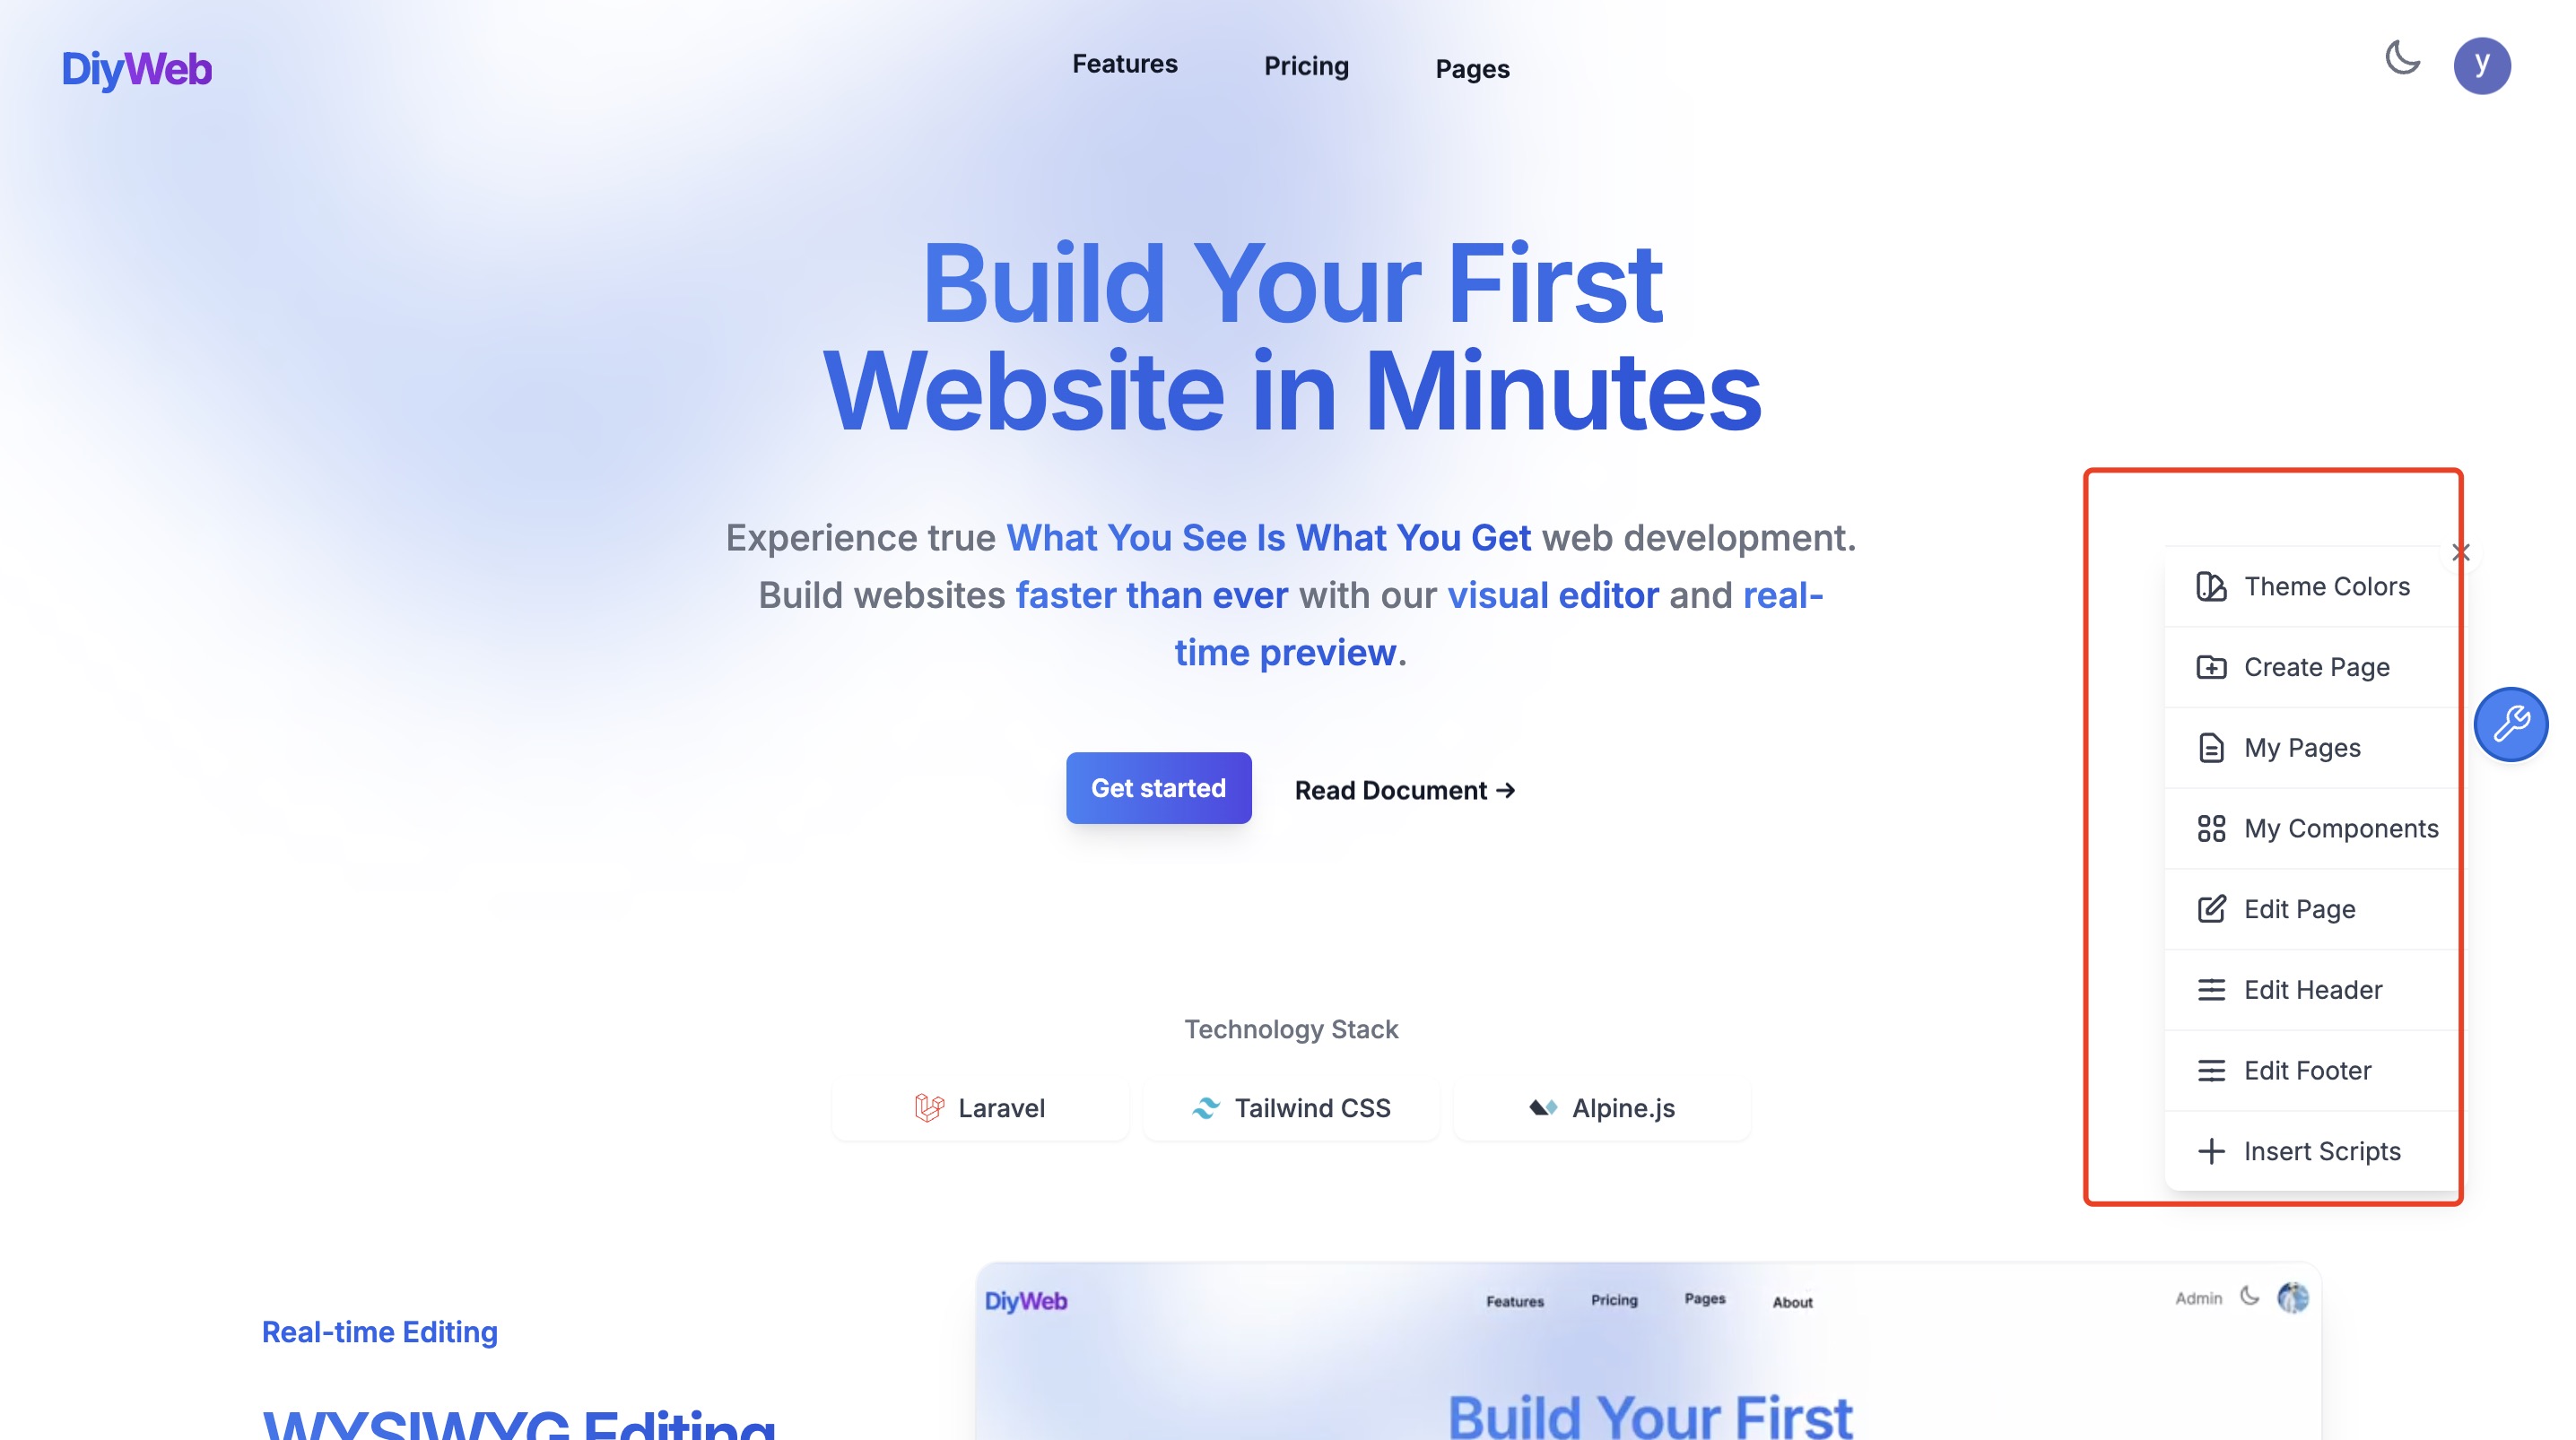
1. Theme Colors
Functionality: Set the website's theme colors.
Usage Scenarios:
- Customize the website's color scheme.
- Enhance brand identity.
2. Create Page
Functionality: Create a new page.
Usage Scenarios:
- Add new pages.
- Organize the website's structure.
3. My Pages
Functionality: View all pages.
Usage Scenarios:
- Manage website pages.
- Quickly navigate to a specific page.
4. My Components
Functionality: View all components.
Usage Scenarios:
- Manage website components.
- Easily insert components.
5. Edit Page
Functionality: Edit page content.
Usage Scenarios:
- Modify page content.
- Adjust page layouts.
6. Edit Header
Functionality: Edit the header content.
Usage Scenarios:
- Modify the header.
- Adjust header layout.
7. Edit Footer
Functionality: Edit footer content.
Usage Scenarios:
- Modify the footer.
- Adjust footer layout.
8. Insert Script
Functionality: Insert third-party JavaScript scripts at the end of the page (e.g., Google Analytics, ChatGPT plugins).
Usage Scenarios:
- Add website analytics tracking code.
- Integrate customer support chat tools.
- Insert SEO optimization scripts.
Example Code:
<!-- Google tag (gtag.js) -->
<script async src="https://www.googletagmanager.com/gtag/js?id=G-XXXXXXXXXX"></script>
<script>
  window.dataLayer = window.dataLayer || [];
  function gtag(){dataLayer.push(arguments);}
  gtag('js', new Date());
  gtag('config', 'G-XXXXXXXXXX');
</script>
Code Editor
Usage: Click the plus (+) button to quickly create pages using built-in template components.

Advanced Usage
Building Built-In Templates in the Code Editor
To create a built-in template named "hello-diyweb", follow these steps:
Create a file called
hello-diyweb.blade.phpin theresources/views/components/insertabledirectory.Write the template code inside
hello-diyweb.blade.php:<div> hello diyweb </div>In the code editor, click the plus (+) button; the newly added "hello-diyweb" template will be available for selection.
Creating Editable Components and Embedding Them in a Page
Component Attribute Descriptions
| Attribute Name | Type | Default Value | Description | Example Usage |
|---|---|---|---|---|
| id | string | Required | Unique identifier for the component, used for content storage and positioning | id="component-hero-title" |
| tag | string | div | HTML tag to be rendered | tag="h2" |
| file | string | null | Component file path (relative to the resources/views directory) | file="views/components/editable/hero-title.blade.php" |
| previewEnabled | string | true | Indicates whether real-time preview is enabled ("true"/"false") | previewEnabled="false" |
| type | string | component | Component type ('component' for standard components, 'page' for page components) | type="page" |
| defaultClass | string | editable | Default CSS class name | defaultClass="special-editable" |
| editable | bool | app()->environment('local') | Determines whether the edit mode is enabled (usually auto-detected) | :editable="true" |
Create a file named
diyweb-component.blade.phpin theresources/views/components/editabledirectory following the existing component structure:<x-editable id="component-diyweb-example" tag="div" file="views/components/editable/diyweb-example.blade.php" {{ $attributes }} > <!-- Component content --> <div class="p-6 transition-all duration-300 bg-white rounded-lg shadow-md dark:bg-gray-800 hover:shadow-xl"> <h3 class="text-xl font-semibold text-secondary-900 dark:text-white"> <span class="text-transparent bg-gradient-to-r from-primary-400 via-primary-500 to-primary-700 bg-clip-text animate-gradient-x"> Custom Component Title </span> </h3> <p class="mt-4 text-secondary-600 dark:text-gray-300"> This is your custom editable content area. </p> </div> </x-editable>Embed the component within a page:
<x-editable.diyweb-example />When hovering over the component, an edit button appears. Click it to enter editing mode.
Deployment
Please refer to the Laravel 11.x Deployment Documentation for detailed deployment procedures.
When deploying to a production environment, please consider the following:
Environment Configuration
SetAPP_ENVtoproductionin the admin system settings. This disables all real-time editing features, ensuring production security.Debug Mode
Ensure that debugging is disabled (setAPP_DEBUG=false) in production to prevent leakage of sensitive information.Security Measures
It is recommended to configure HTTPS, properly set up firewalls, and adjust permissions to safeguard your application's secure operation.
Following these guidelines will help ensure that your Laravel project runs efficiently and securely in a production environment.